> ## Documentation Index
> Fetch the complete documentation index at: https://playbook.smedleygroup.com/llms.txt
> Use this file to discover all available pages before exploring further.
# Configuring the Seller Domain (DNS)
> How to connect a custom seller (shop) domain to a Vivenu seller and verify it via DNS in GoDaddy.
## Overview
By default a new Vivenu seller is served from an auto-generated `vivenushop.com` address. This SOP covers connecting a branded custom domain (the customer-facing shop URL) to the seller and verifying ownership through a DNS record in GoDaddy.
This SOP assumes you already know how to access and navigate Vivenu. If you need access, [email support](mailto:advanced-technology-c0a6ecefe97b@intake.linear.app).
***
## Prerequisites
* Vivenu access for the relevant seller
* Access to the `fat-kartingleague.com` DNS in [GoDaddy](https://dcc.godaddy.com/)
* The hub code confirmed (e.g. `de` for Germany, `us-ca` for US California). See the [naming convention](/software/third-party/vivenu/general/vivenu-naming-convention) for how hub codes are assigned.
***
## Connecting the Custom Domain
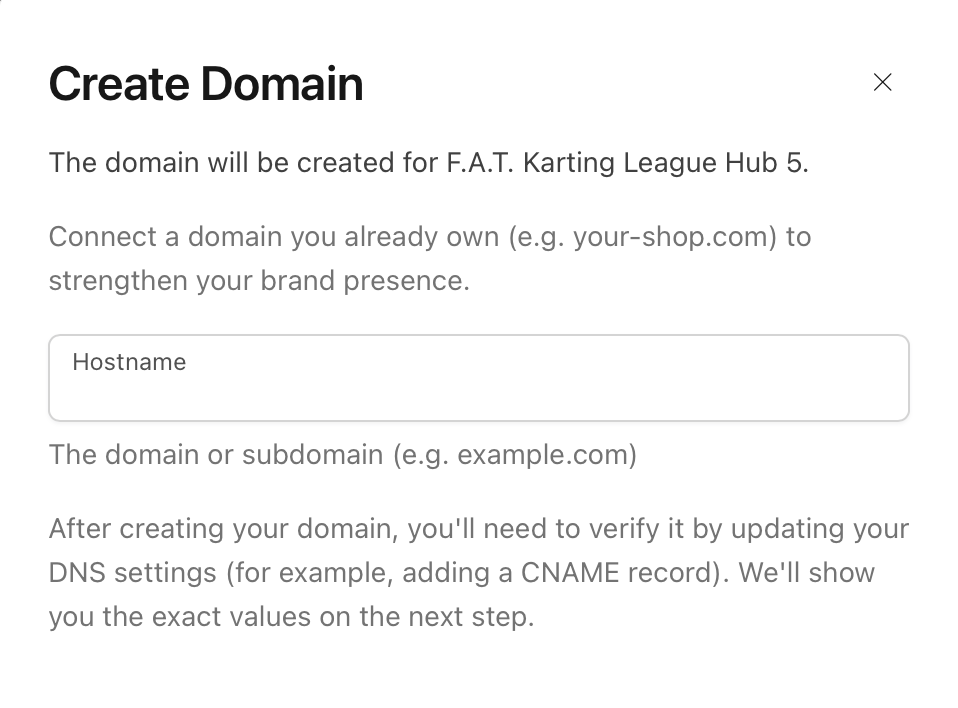
Under **Settings > Domains**, click **Connect custom domain**.
In the **Create Domain** dialog, enter the **Hostname** using the convention:
```
shop..fat-kartingleague.com
```
Where `` is the code for your hub. For example, for Germany this is `shop.de.fat-kartingleague.com`.
 ***
## Adding the DNS Record
After creating the domain, Vivenu displays a single **CNAME** record to add to your DNS. It will show as **PENDING** until the record is verified.
Note the two values Vivenu provides:
| Field | Use as | Example value |
| ------------- | ------------------------------- | ------------------------------- |
| Hostname | Host / Name of the CNAME record | `shop.de.fat-kartingleague.com` |
| CNAME Content | Value / Target / Destination | `domains.vivenu.com` |
***
## Adding the DNS Record
After creating the domain, Vivenu displays a single **CNAME** record to add to your DNS. It will show as **PENDING** until the record is verified.
Note the two values Vivenu provides:
| Field | Use as | Example value |
| ------------- | ------------------------------- | ------------------------------- |
| Hostname | Host / Name of the CNAME record | `shop.de.fat-kartingleague.com` |
| CNAME Content | Value / Target / Destination | `domains.vivenu.com` |
 In [GoDaddy](https://dcc.godaddy.com/), open the DNS management for `fat-kartingleague.com` and add a new **CNAME** record using the **Hostname** and **CNAME Content** values from the previous step.
Enter only the host portion (e.g. `shop.de`) - GoDaddy appends the root domain automatically. The fully qualified record must resolve to `shop..fat-kartingleague.com`.
***
## Verifying and Setting as Primary
DNS changes can take a few minutes to become active. Allow time for the record to propagate before expecting verification to succeed.
Return to **Settings > Domains** and refresh the page periodically. Once the record is verified, the domain's **Status** and **SSL** will both show **ACTIVE**.
Click **Set as primary** on the custom domain row. It will then show the **PRIMARY** badge, and the default `vivenushop.com` domain will no longer be primary.
In [GoDaddy](https://dcc.godaddy.com/), open the DNS management for `fat-kartingleague.com` and add a new **CNAME** record using the **Hostname** and **CNAME Content** values from the previous step.
Enter only the host portion (e.g. `shop.de`) - GoDaddy appends the root domain automatically. The fully qualified record must resolve to `shop..fat-kartingleague.com`.
***
## Verifying and Setting as Primary
DNS changes can take a few minutes to become active. Allow time for the record to propagate before expecting verification to succeed.
Return to **Settings > Domains** and refresh the page periodically. Once the record is verified, the domain's **Status** and **SSL** will both show **ACTIVE**.
Click **Set as primary** on the custom domain row. It will then show the **PRIMARY** badge, and the default `vivenushop.com` domain will no longer be primary.
